HOW TO: FreeBSD Partition Alignment for RAID, SSDs & 4k Disk Drives
Last Updated January 21st, 2017. This article is really popular, I’ll do my best to keep it up to date! I’ve added notes about enabling TRIM support.
Aligning Partitions Under FreeBSD for Optimum Performance with RAID Arrays, SSDs and 4k Disk Drives
Note: These instructions have been verified to work for FreeBSD 9.1, FreeBSD 9.2, FreeBSD 10.0, FreeBSD 10.1, FreeBSD 11.0 .
By default the FreeBSD installer does not create properly aligned partitions for use with a RAID array, SSD, or 4k drives (sometimes called AdvancedFormat).
This presents a major performance issue when using a RAID array or 4k drive (including SSDs) because a single OS-level I/O operation ends up triggering two or more disk and controller I/O operations when they are unnecessary:
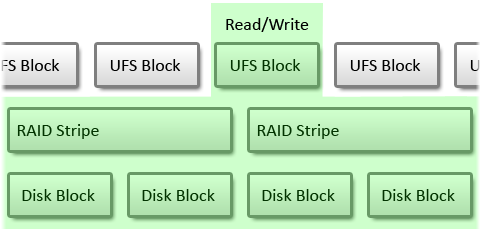
As you can see that the middle UFS block is sitting on the border between two RAID blocks and subsequently triggers four I/O operations to get that one OS block. For non-RAID setups the situation is similar (just remove the RAID Stripe layer).
With partitions aligned to the boundaries of all subsequent device’s blocks the ‘wasted’ I/O is cut in half. For a RAID controller this means the stripe size and the underlying hard disks’ block sizes. For SSDs and AdvancedFormat disks this is just the block size (typically 4k):
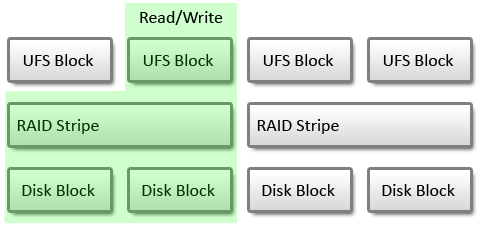
With aligned partitions you can see that a single operation now only triggers 1 RAID I/O operation.
The key is to have all the boundaries lined up: File system (OS), RAID array stripe size (if you are using RAID), and finally the disk(s)’ physical block size.
Here is an example of the performance difference under FreeBSD 9.0 with an LSI 3ware 9750-8i with six SATA 6 Gb/s disks running RAID 10:
| Partitioning | Write Speed | Read Speed | Random Seeks |
|---|---|---|---|
| Unaligned | 250 MiB/sec | 316 MiB/sec | 266 per sec |
| Aligned | 366 MiB/sec | 388 MiB/sec | 334 per sec |
In this case we saw a 46% increase in writes, 22% increase in reads and 25% increase in seeks per second.
The Good News
Fortunately its fairly straight forward to properly align your partitions during the install process.
In this walk through we’ll use the FreeBSD installer to manually setup a GPT partition table, create the aligned partitions we need, and then newfs our root file system.
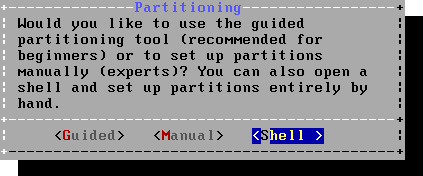
Step 1: Boot The FreeBSD Installer
Start the FreeBSD install process as normal. When you are asked about how you want to partition the disk pick “Shell”:
Step 2: Setup The Partitions
Once inside the shell use these commands to setup GPT and slice up both disks.
This example assumes you are doing this on disk ‘da0’ (SCSI) and uses 1 MiB alignment. The key here is the -a option for the UFS partition which specifies the alignment (for both the beginning and end of the partition). We recommend 1 MiB alignment as it is going to work for anything from 4k drives to any kind of RAID stripe size up to 1 MiB. This will also leave a small amount of space at the end of the disk as well — useful if you get a replacement disk from a different vendor which is slightly smaller.
# ---- Setup the GPT and partitions
        gpart create -s gpt da0
        gpart add -s 128k -t freebsd-boot -l boot0 da0
        gpart add -a 1m -s 8G -t freebsd-swap -l swap0 da0
        gpart add -a 1m -t freebsd-ufs -l root0 da0

        # -- Install boot code
        gpart bootcode -b /boot/pmbr -p /boot/gptboot -i 1 da0
You’ll notice I’m not aligning the boot or swap partitions as they don’t have “real” filesystems with blocks. If you are using separate /var /usr, /tmp etc partitions you’ll want to use the -a option for those, too.
Step 3: Create And Mount The Root (/) Filesystem
Here we actually format the root filesystem, enabling soft updates (-U). I also use “-L root” to set the filesystem label but this isn’t needed. Then we mount the new filesystem in /mnt (which is where the installer expects the target filesystem to be).
If you are using SSDs add the -t option to the newfs call below so that TRIM support is enabled from the start.
# -- For HDDs:
        newfs -U -L root /dev/da0p3
        # -- For SSDs:
        newfs -t -U -L root /dev/da0p3

        mount /dev/da0p3 /mnt
We now need to create the fstab file which will be put into place by the installer:
vi /tmp/bsdinstall_etc/fstab# Device Mountpoint FStype Options Dump Pass#
/dev/da0p2 none swap sw 0 0
/dev/da0p3 / ufs rw 1 1Exit out of the partitioning shell to resume the setup:
exitStep 4: Resume The Setup
That’s it! Continue through the rest of the install as you normally would do.
Final Thoughts
If you’re installing FreeBSD on a RAID array, SSD or 4k drive I highly recommend running through a few installs and using a tool like bonnie (in ports) to test the I/O performance and verify that things do improve after alignment and that you’re seeing the speeds you expect. Its easy to do this before you start customizing the machine and installing things vs. after.
Need help with Linux or FreeBSD infrastructure?
A-Team Systems provides engineer-led support for production Linux and FreeBSD environments, including troubleshooting, operational oversight, and ongoing infrastructure management.
Contact A-Team Systems