HOW TO: Windows 10 Under Bhyve /w FreeBSD 11
With FreeBSD 11 comes a new version of Bhyve with a feature that makes installing Windows 10 a snap: a VNC accessible framebuffer driver! This lets any GUI OS, such as Windows, boot into graphics mode on the console.
Previously getting Windows working was possible but required a lot of effort to create a custom install ISO and use Windows’ archaic installer command line interface. No more! With the VNC framebuffer everything installs fine with any normal Windows 10 ISO image.
Getting Started / Lessons Learned
Getting things working is very easy — once you know what to do. Let’s start off by explaining the lessons I learned:
Use RealVNC or TigerVNC
TigerVNC has been tested under FreeBSD. If you’re on Windows do not try to use TightVNC, UltraVNC or anything else. It will not work. I wasted hours due to this 😛 Download RealVNC.
The LPC Device
We’ll be using the ‘LPC’ device as it maps the console “BIOS” (pre-framebuffer/UEFI) to the console.
The key here is that you must assign it to slot number 31 or the VM won’t work properly and you’ll see weird errors when you try to type on the console: atkbd data buffer full for every key pressed.
Use USB 3.0
USB 3.0 supports absolute X/Y coordinates for the mouse which makes the VNC use a lot nicer, so we’ll use the xhci (USB 3.0) device in tablet mode to achieve this.
You Can Resize Disks
Windows 7 and up let you resize volumes on the fly from the Disk Management applet (accessible in Windows 10 by right clicking on the Windows logo on the task bar). You can right click on the appropriate volume and shrink or expand it.
To expand it first you’ll want to resize the host disk image volume itself, then reboot the VM (as Bhyve doesn’t update this information on the fly), then go into Disk Management and you’ll see the extra free space at the end of the volume.
To expand a disk image file just pick a larger value and re-run truncate on it with the larger size:
truncate -s 64G os_disk.imgTo expand a disk ZFS dataset:
# -- Adjust size:
        zfs set volsize=64G zroot/vms/win10/os_disk

        # -- Check size:
        zfs get volsize zroot/vms/win10/os_disk
These are examples which follow the naming conventions and sizes we use below, adjust as appropriate.
Cores vs. Sockets
Windows 10 64-bit supports up to 2 sockets (or physical CPUs), with up two 256 cores supported. This is an important distinction, since most workstations have a single physical CPU with 4-8 cores.
Bhyve, by default, however presents each core as a physical CPU to the guest OS, thus if you try to give Windows more than 2 CPUs it will only see the first two.
To fix this the following sysctl must be set in /boot/loader.conf (and a reboot to take effect):
hw.vmm.topology.cores_per_package=4I was not able to find any documentation on this sysctl, but from my testing this is a “grouping” value. So if you specify 4, and give a VM 6 CPUs it will show 4 cores on the first, and 2 on the second. You can still give a VM an arbitrary number of CPUs, including less than this value (1, 2 or 3 will work) and will show to the guest as a single physical CPU with that many core(s).
I welcome any further information on this in the comments!
Setup
OK, so let’s get things going!
Firmware
First install the Bhyve UEFI firmware package:
pkg install -y bhyve-firmwareNetworking & Kernel Modules
In /etc/rc.conf add these lines:
cloned_interfaces="bridge0 tap10"
        ifconfig_bridge0="addm em0 addm tap10"
Where em0 is the NIC you wish to share with your VM. This creates a bridge between the host’s real NIC (em0) and the VM’s virtual NIC (tap10) so it can get out.
Next add the following to /boot/loader.conf:
vmm_load="YES"
        if_tap_load="YES"
And this to /etc/sysctl.conf:
net.link.tap.up_on_open=1Reboot to have these changes take effect.
Once you’ve booted back up continue on!
Create Virtual Disk
You have two options, you can create a virtual disk file directly, or use a ZFS dataset and have the VM access it directly (if you’re using ZFS). Each has its advantages, the image file is simplest and will work regardless of underlying filesystem.
Here is how to create a 32 GiB disk image file:
truncate -s 32G os_disk.imgOr, if you wish to create a ZFS dataset instead:
zfs create -V 32G -o refreservation=none zroot/vms/win10/os_diskThe above is a suggested location obviously, if you’re running ZFS I trust you know what you’re doing 🙂
Windows ISO
We’ll assume you already have a Windows 10 install ISO called windows10.iso.
VirtIO Driver ISO
Once we install the OS we’ll need to load VirtIO networking drivers to get the virtual NIC running, download the VirtIO driver ISO here.
First Launch – Install Windows
The command below will wait for you to connect via VNC (on port 5900) before booting, which you’ll need to do. I’ve found the VNC driver is wonky if you don’t use it with the wait parameter, or if you disconnect and reconnect, so be warned — do everything in one go.
Once we have the OS up and running we’ll switch to RDP / Remote Desktop instead.
So! Let’s bring up a 2 core (-c 2) 4 GiB of RAM (-m 4G) instance:
bhyve -c 2 -m 4G -H -w \
          -s 0,hostbridge \
          -s 3,ahci-cd,windows10.iso \
          -s 4,ahci-hd,os_disk.img \
          -s 5,virtio-net,tap10 \
          -s 29,fbuf,tcp=0.0.0.0:5900,wait \
          -s 30,xhci,tablet \
          -s 31,lpc \
          -l com1,stdio \
          -l bootrom,/usr/local/share/uefi-firmware/BHYVE_UEFI.fd \
          win10
Note: If you opted for using a ZFS dataset as a virtual disk you’ll specify the disk as the zvols dev node, for example: /dev/zvol/zroot/vms/win10/os_disk instead of os_disk.img.
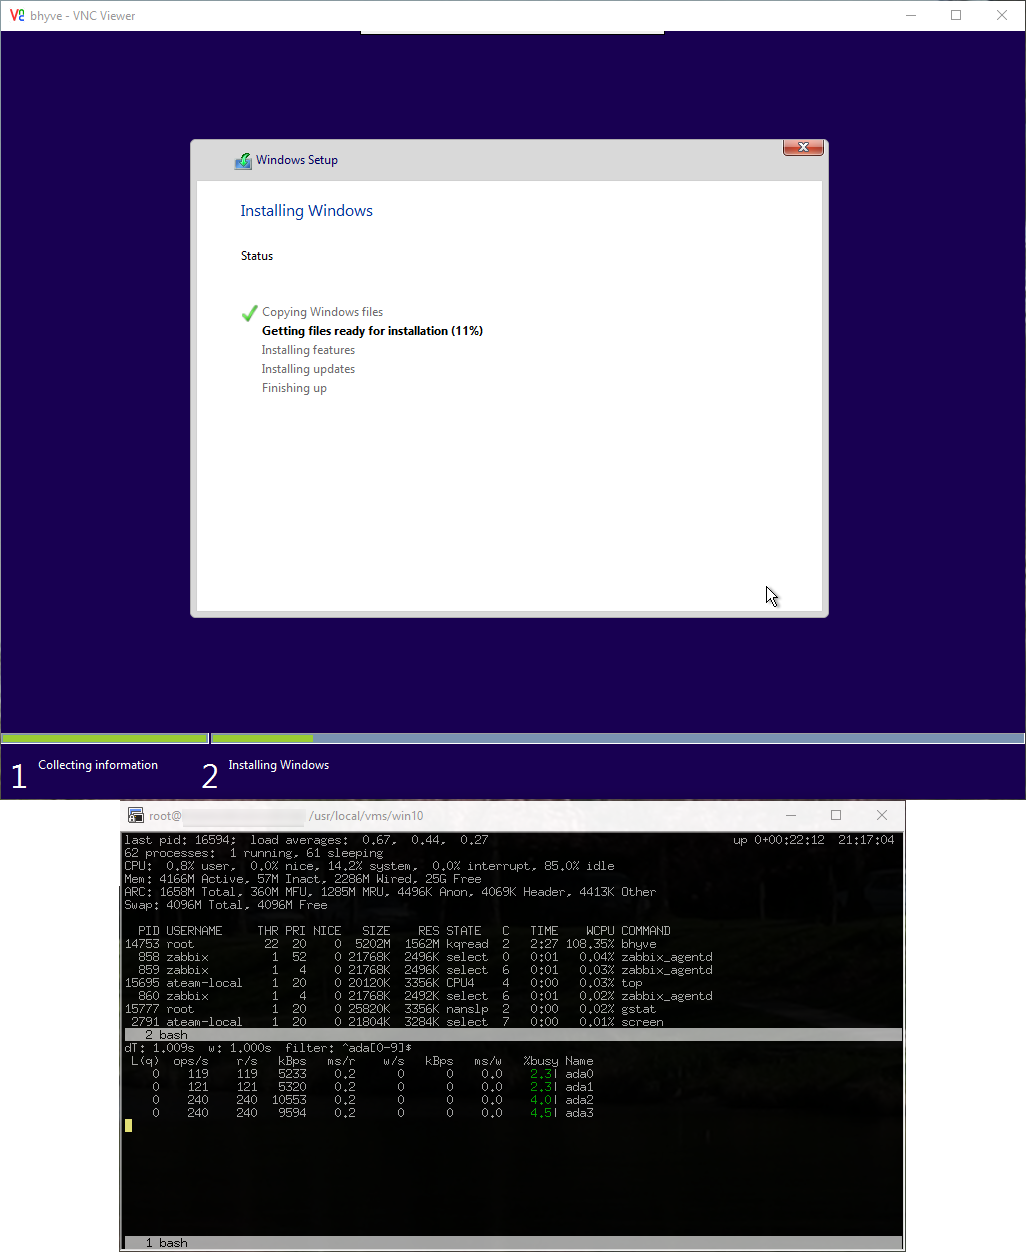
Go ahead and connect via VNC, you should see a message Press any key to boot from CD ... be sure to press a key to enter the installer.
Proceed through the installer and install Windows! When the installer is done the VM will reboot and Bhyve will exit.
Second Launch – Install Networking
We’ll bring the instance back up, this time with the VirtIO driver ISO in the VM’s CD drive:
bhyve -c 2 -m 4G -H -w \
          -s 0,hostbridge \
          -s 3,ahci-cd,virtio-win-0.1.118.iso \
          -s 4,ahci-hd,os_disk.img \
          -s 5,virtio-net,tap10 \
          -s 29,fbuf,tcp=0.0.0.0:5900,wait \
          -s 30,xhci,tablet \
          -s 31,lpc \
          -l com1,stdio \
          -l bootrom,/usr/local/share/uefi-firmware/BHYVE_UEFI.fd \
          win10
Once again, connect via VNC to start booting.
Note: You may see a brief error that the CD is unbootable, then it should boot Windows off the virtual hard drive.
Once logged in open the CD drive and go into the NetKVM\w10\amd64 directory, right click on netkvm and select “install”. This should install the drivers and bring your networking up!
Last we’ll enable RDP since you’ll want to use that instead of VNC moving fowrard:
Right click on the Windows logo on the task bar, and pick “System”. From the System window click “Remote settings” from the left menu.
Select the “Allow remote connections to this computer” option under “Remote Desktop” and click “OK”. Attempt to RDP into the VM.
Once that works, shut the VM down one last time.
Normal Booting
Now that everything is set, we’ll boot the VM without a CD drive or the framebuffer. This is how you’ll normally start the VM from now on:
bhyve -c 2 -m 4G -H -w \
          -s 0,hostbridge \
          -s 4,ahci-hd,os_disk.img \
          -s 5,virtio-net,tap10 \
          -s 30,xhci,tablet \
          -s 31,lpc \
          -l com1,stdio \
          -l bootrom,/usr/local/share/uefi-firmware/BHYVE_UEFI.fd \
          win10
Give it a few moments and you should then be able to RDP in. You’re all set!
I’ve found it to be very stable so far, but you can always re-add the framebuffer line if you have boot issues.
Automatic Startup & Shutdown
While the above command strings will start up your new Windows VM, you probably want it to come up on system startup and at the least be controllable via service start/stop commands.
A-Team Systems has developed Bhyve Management Tool (BMT) specifically for this purpose: see BMT on Github.
It supports FreeBSD, Linux, OpenBSD, NetBSD and Windows VMs as well. Take a look!
Need help with Linux or FreeBSD infrastructure?
A-Team Systems provides engineer-led support for production Linux and FreeBSD environments, including troubleshooting, operational oversight, and ongoing infrastructure management.
Contact A-Team Systems